Instagram has provided us with a space to catch up with our friends, post thirst traps, and stalk our favorite celebrities since 2010. However, whether you’re looking to decrease your screen time, limit your digital footprint, or protect your mental health, there are tons of reasons to move on from the popular social media app and delete Instagram. We’re here to show you how.
If you’re looking to ditch Instagram altogether, we offer step-by-step guides on how to delete the app on desktop, iOS, and Android devices. We also outline how to download your personal activity and deactivate your account temporarily, for those looking to preserve data or return to the app eventually.
Read on for a detailed guide (with screenshots) on how to delete and disable Instagram in 2023 — or jump to a specific section using our links below.
- What’s the Difference Between Deactivating and Deleting Instagram?
- How to Delete/Deactivate Your Account on Desktop
- How to Delete/Deactivate Instagram on iOS App
- How to Delete/Deactivate Instagram on Android App
- How to Reactivate an Instagram Account
- How to Back Up Your Instagram Data
- How to Delete Instagram: FAQs
What’s the Difference Between Deactivating and Deleting Instagram?
If you want to depart from Instagram and hide your account from the public there are two courses of action you can take: deactivation or deletion. Deactivating Instagram will temporarily shut down your account and stop your profile from appearing publically, but will give you the option of restoring it, and all of your media, in the future. It’s definitely going a step further than simply hiding your Like counts, but it’s not the nuclear option either.
Deleting your Instagram, on the other hand, is a permanent action. If you delete your account you will permanently lose your account, profile, username, content, engagement, and followers. Since deleting your Instagram is irreversible, this path is only for users who never plan on returning to the app.
Related: How To Delete or Deactivate Facebook
How To Deactivate Instagram on Desktop
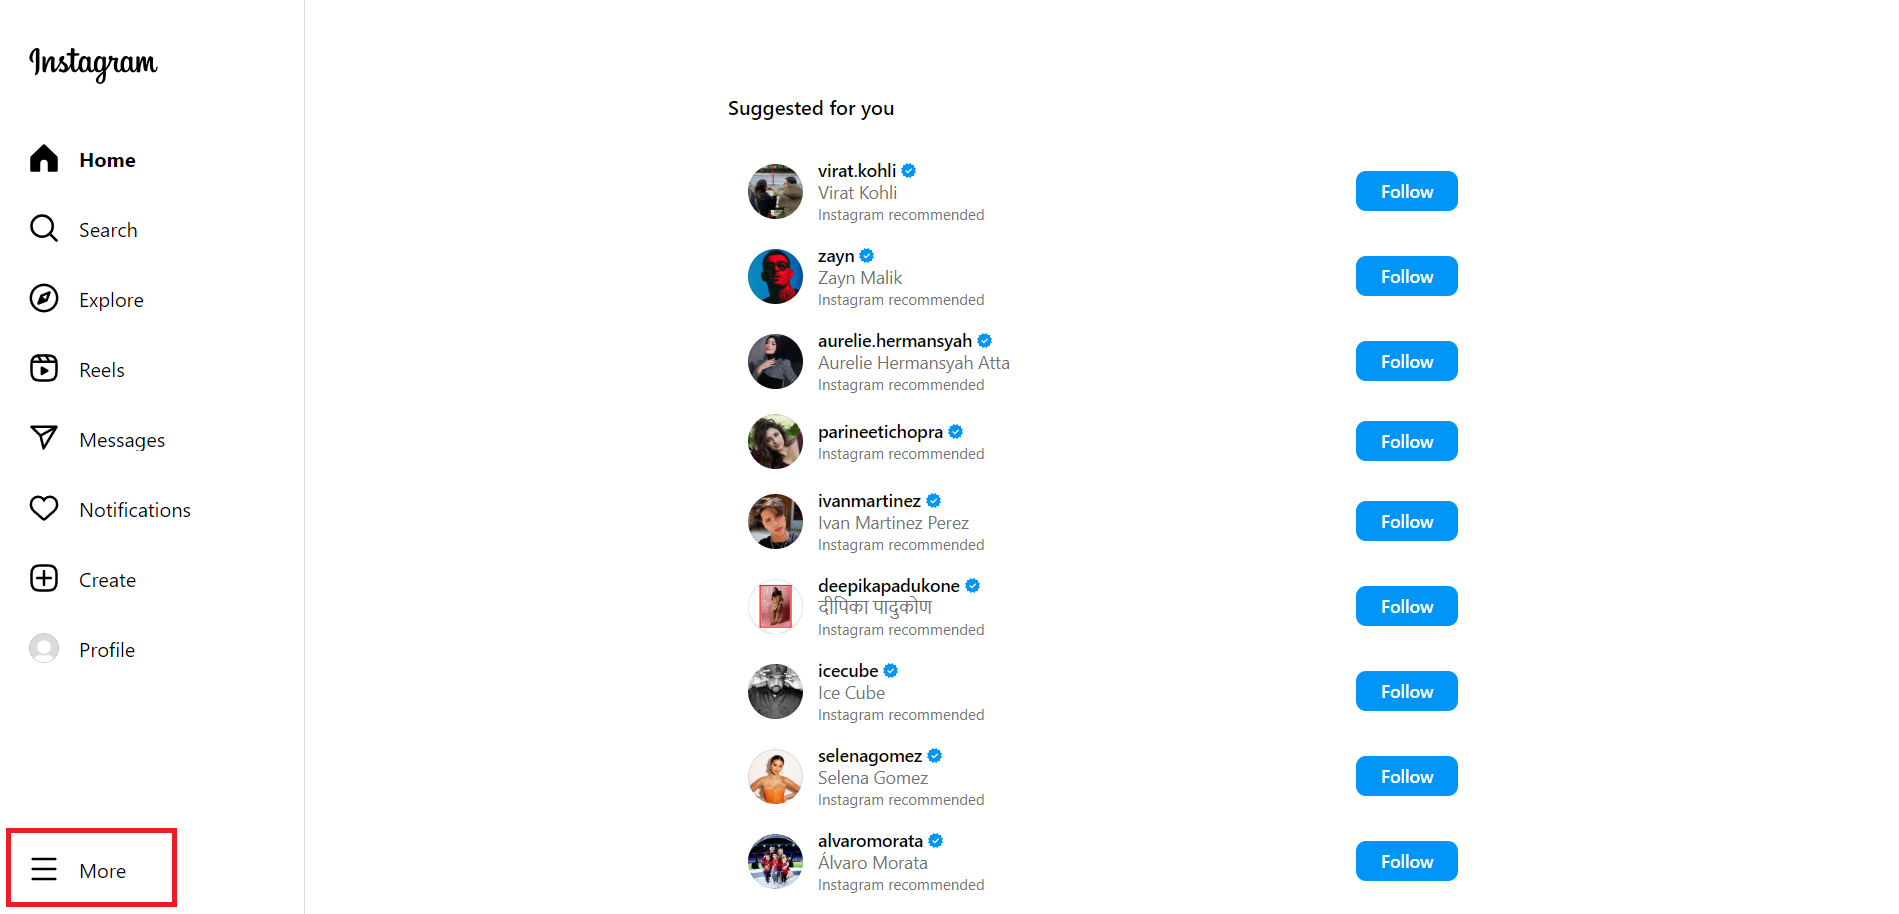
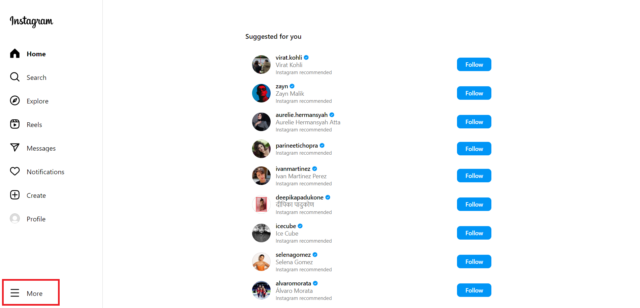
Thankfully, you don’t need a phone to delete or deactivate Instagram, and removing the app on its website is fairly straightforward. All you need to do is follow the steps outlined below:
- Log into your account on the Instagram website
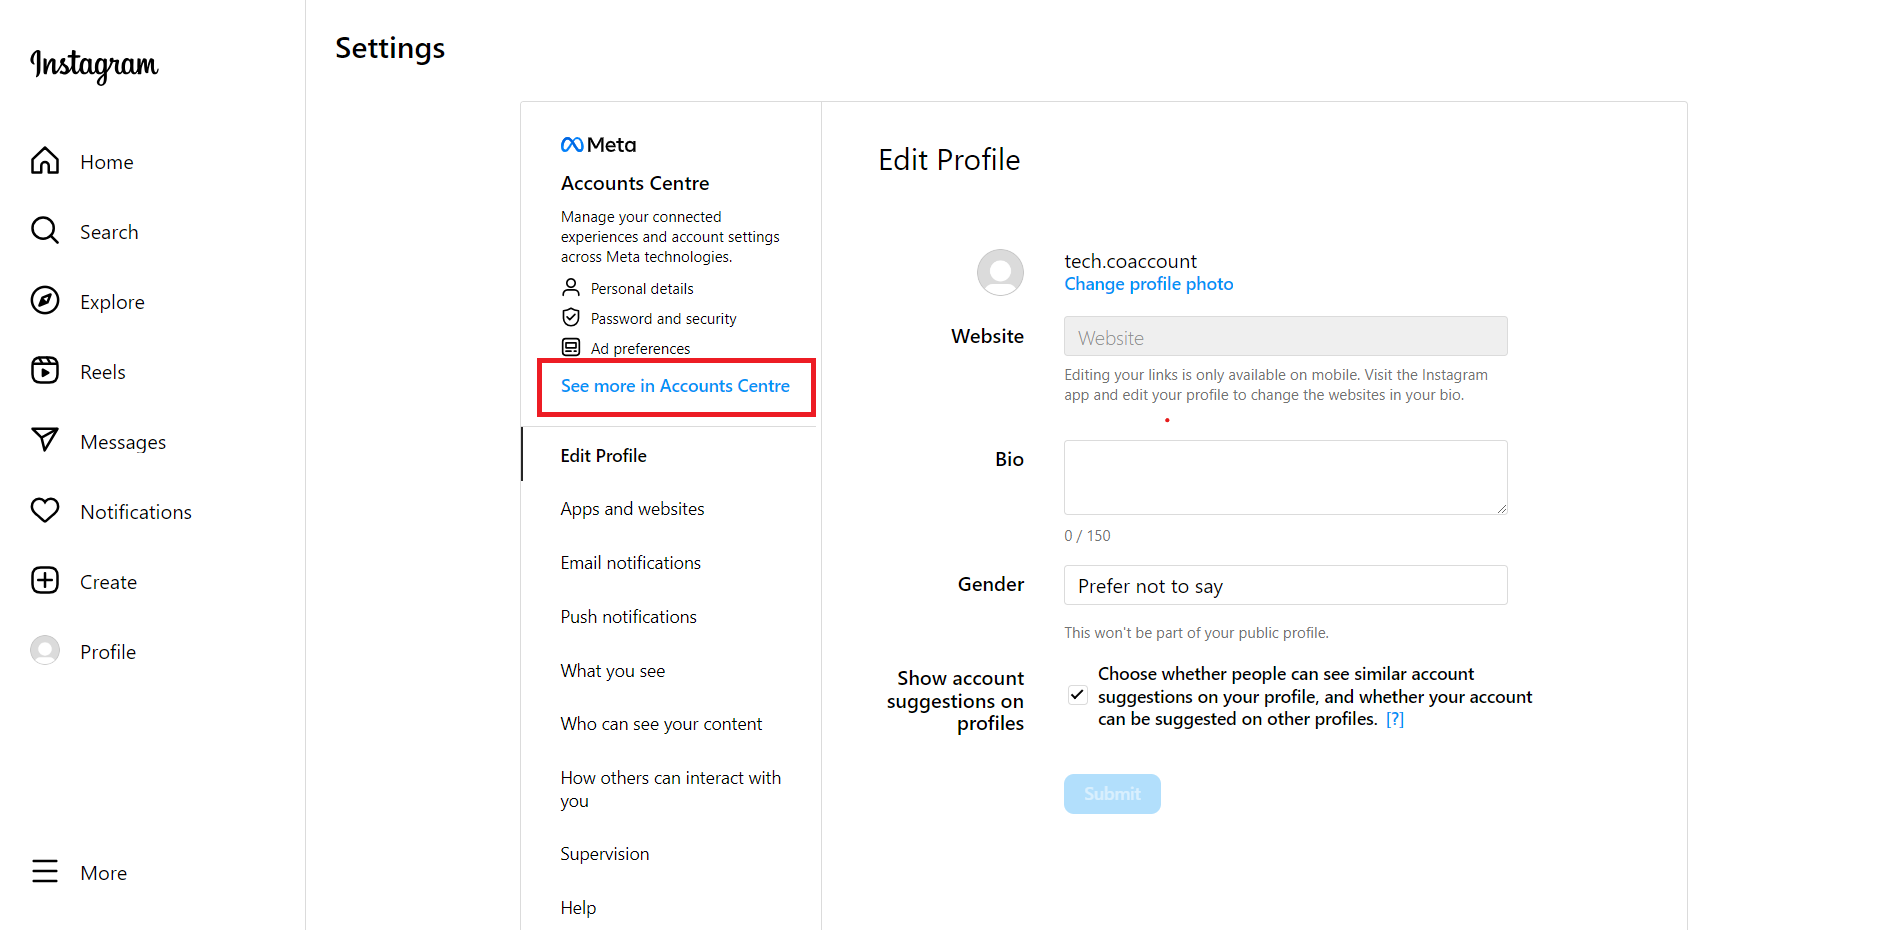
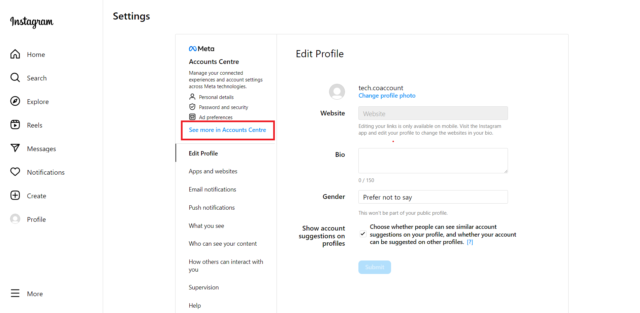
- Select Settings
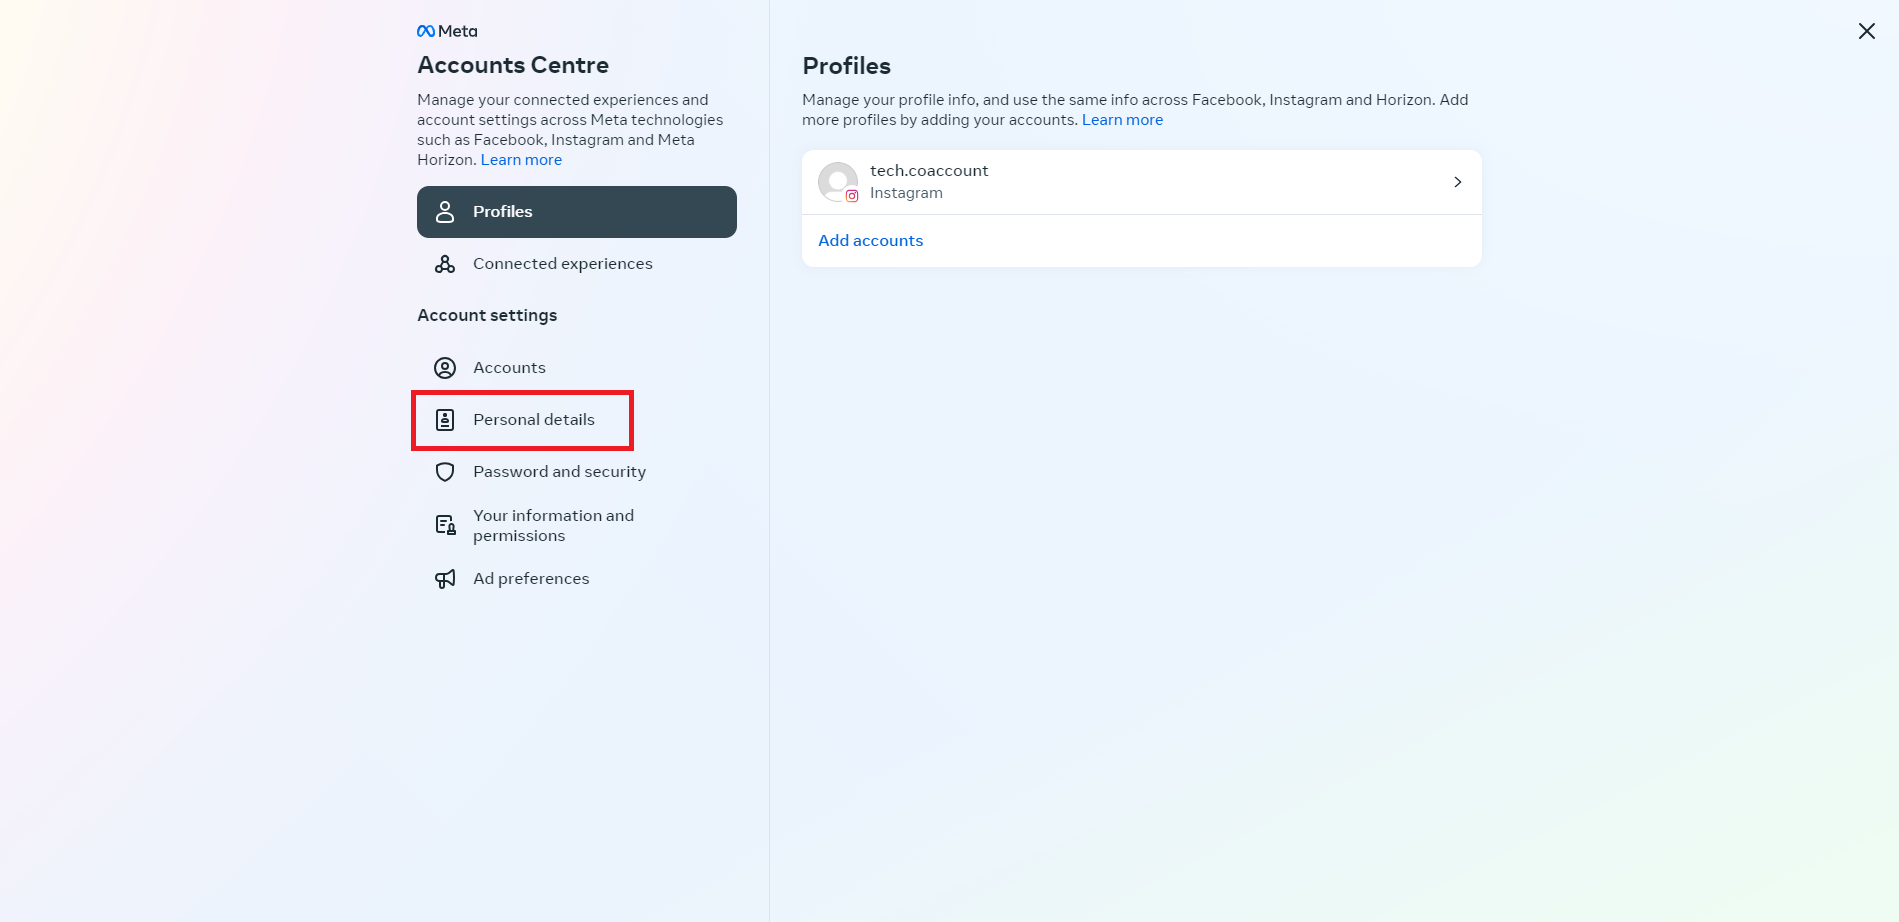
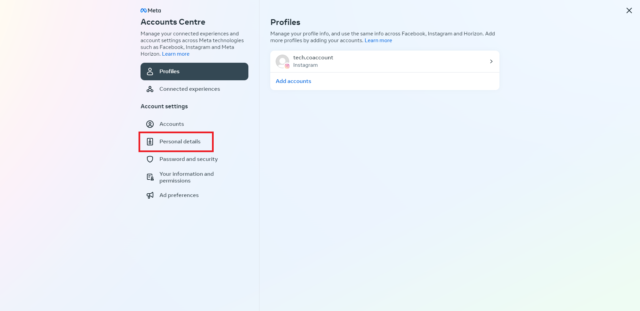
- Click “See more in Accounts Center”
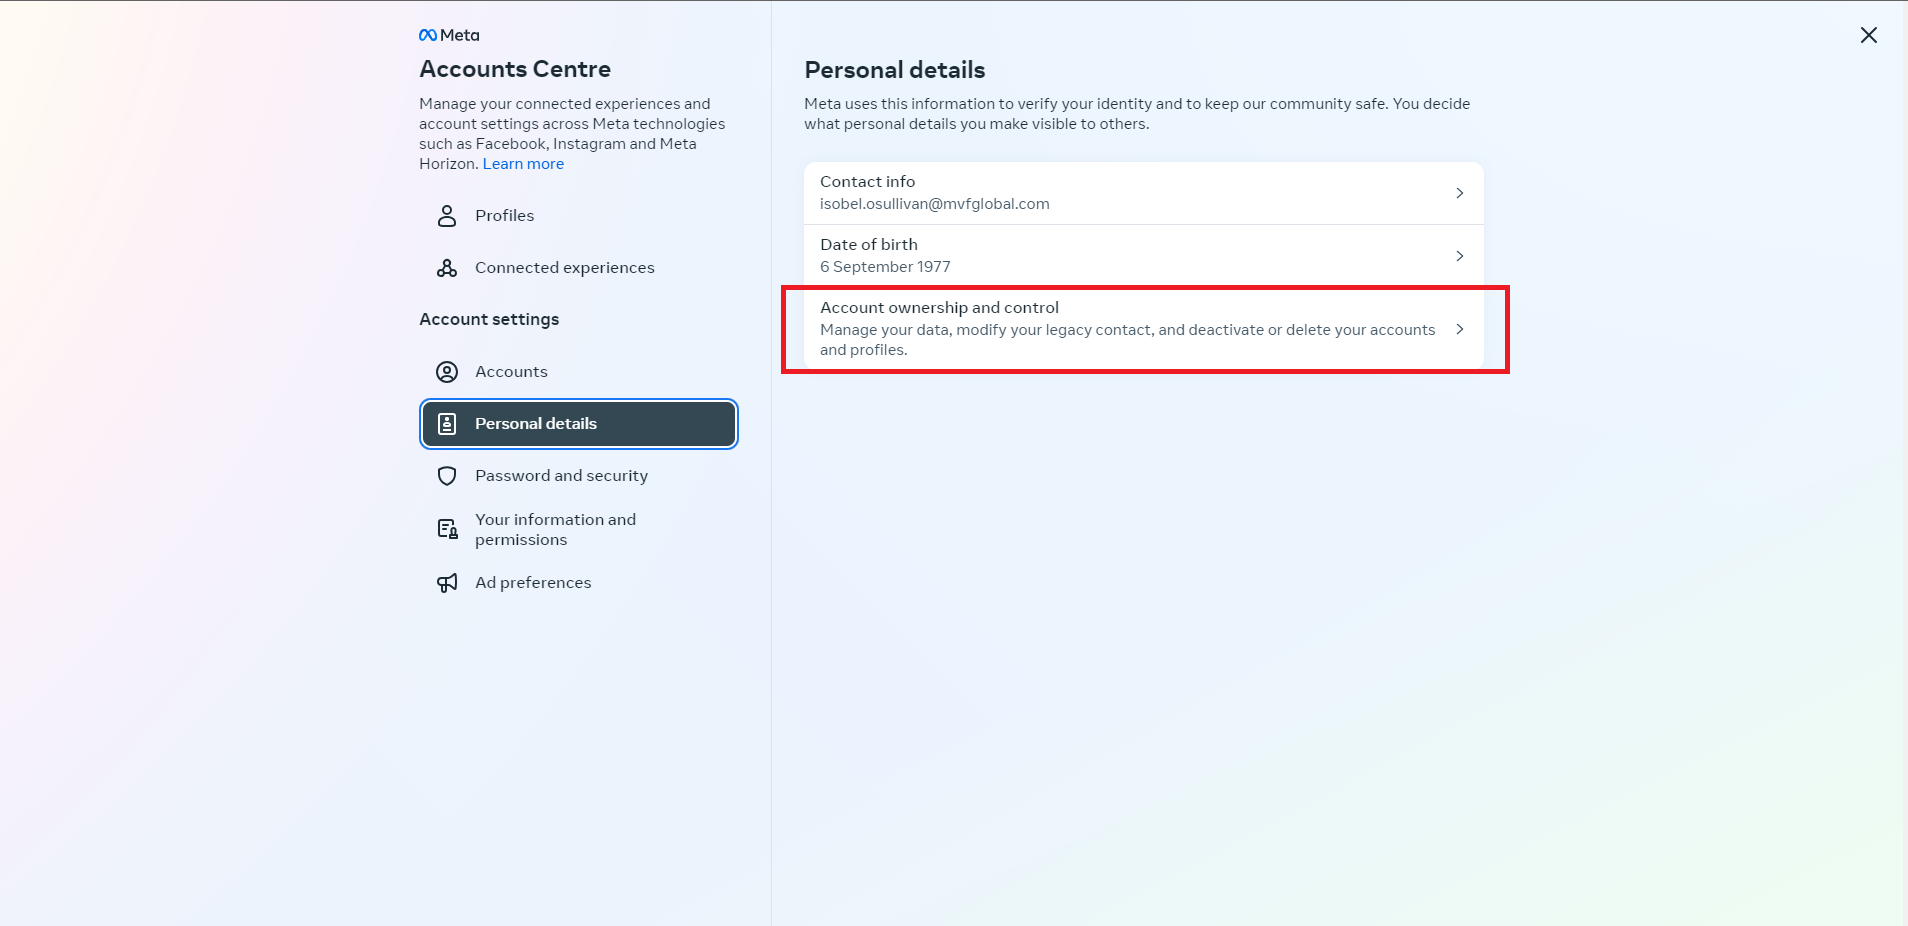
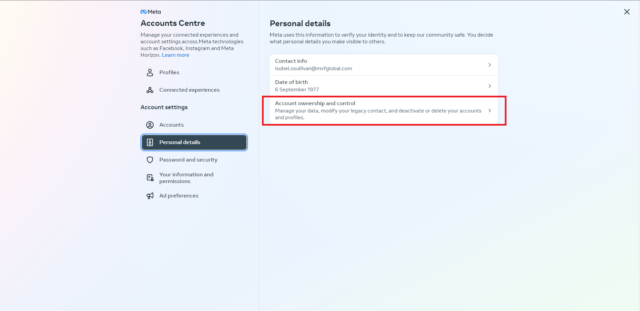
- Select “Personal Details”
- Select “Account ownership and control”
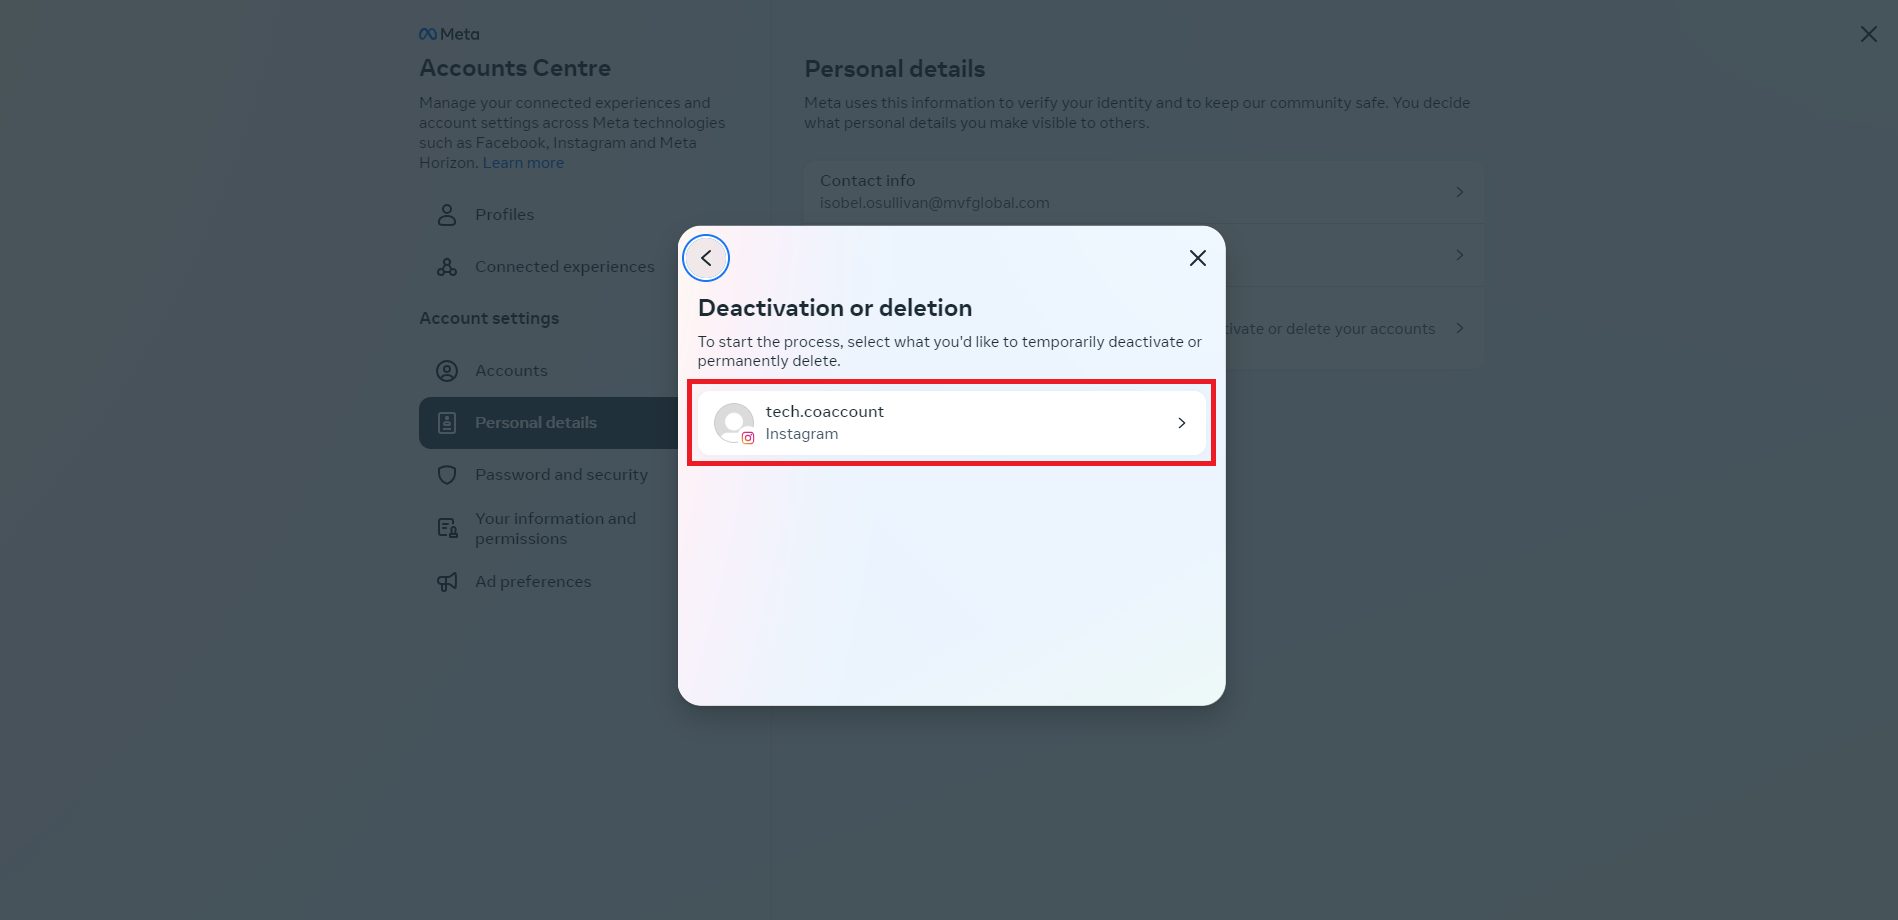
- Select “Deactivation or deletion”
- Select your chosen account
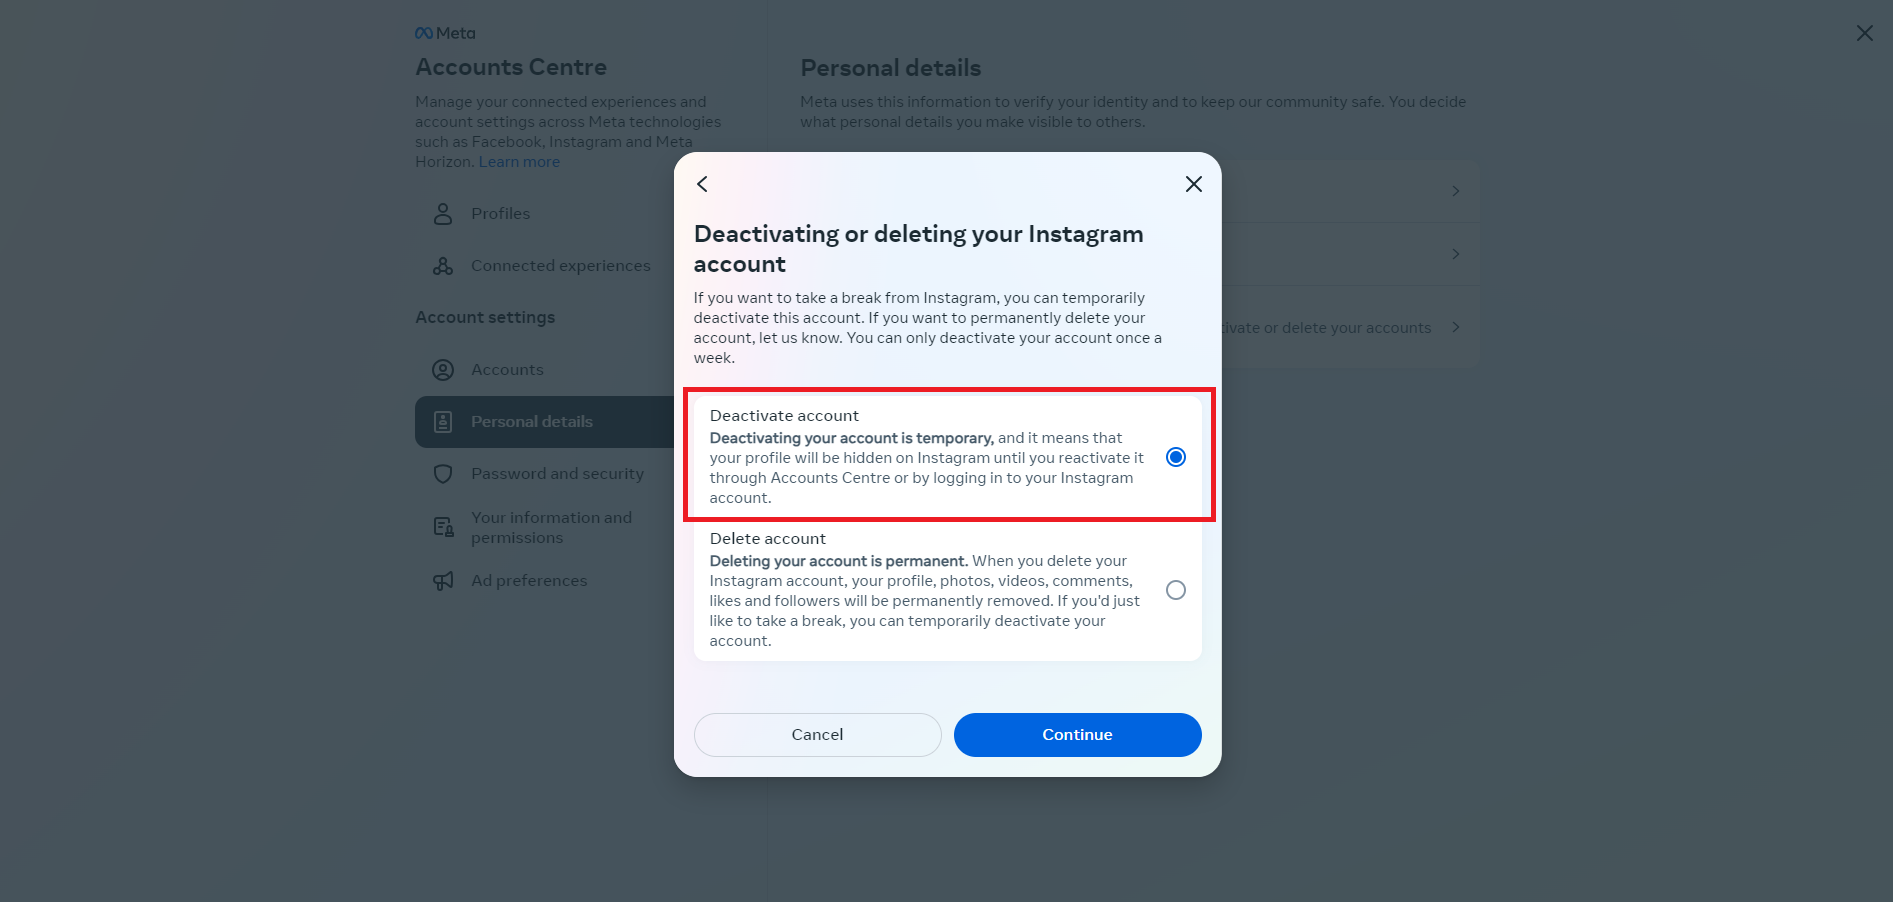
- Click “Deactivate My Account”
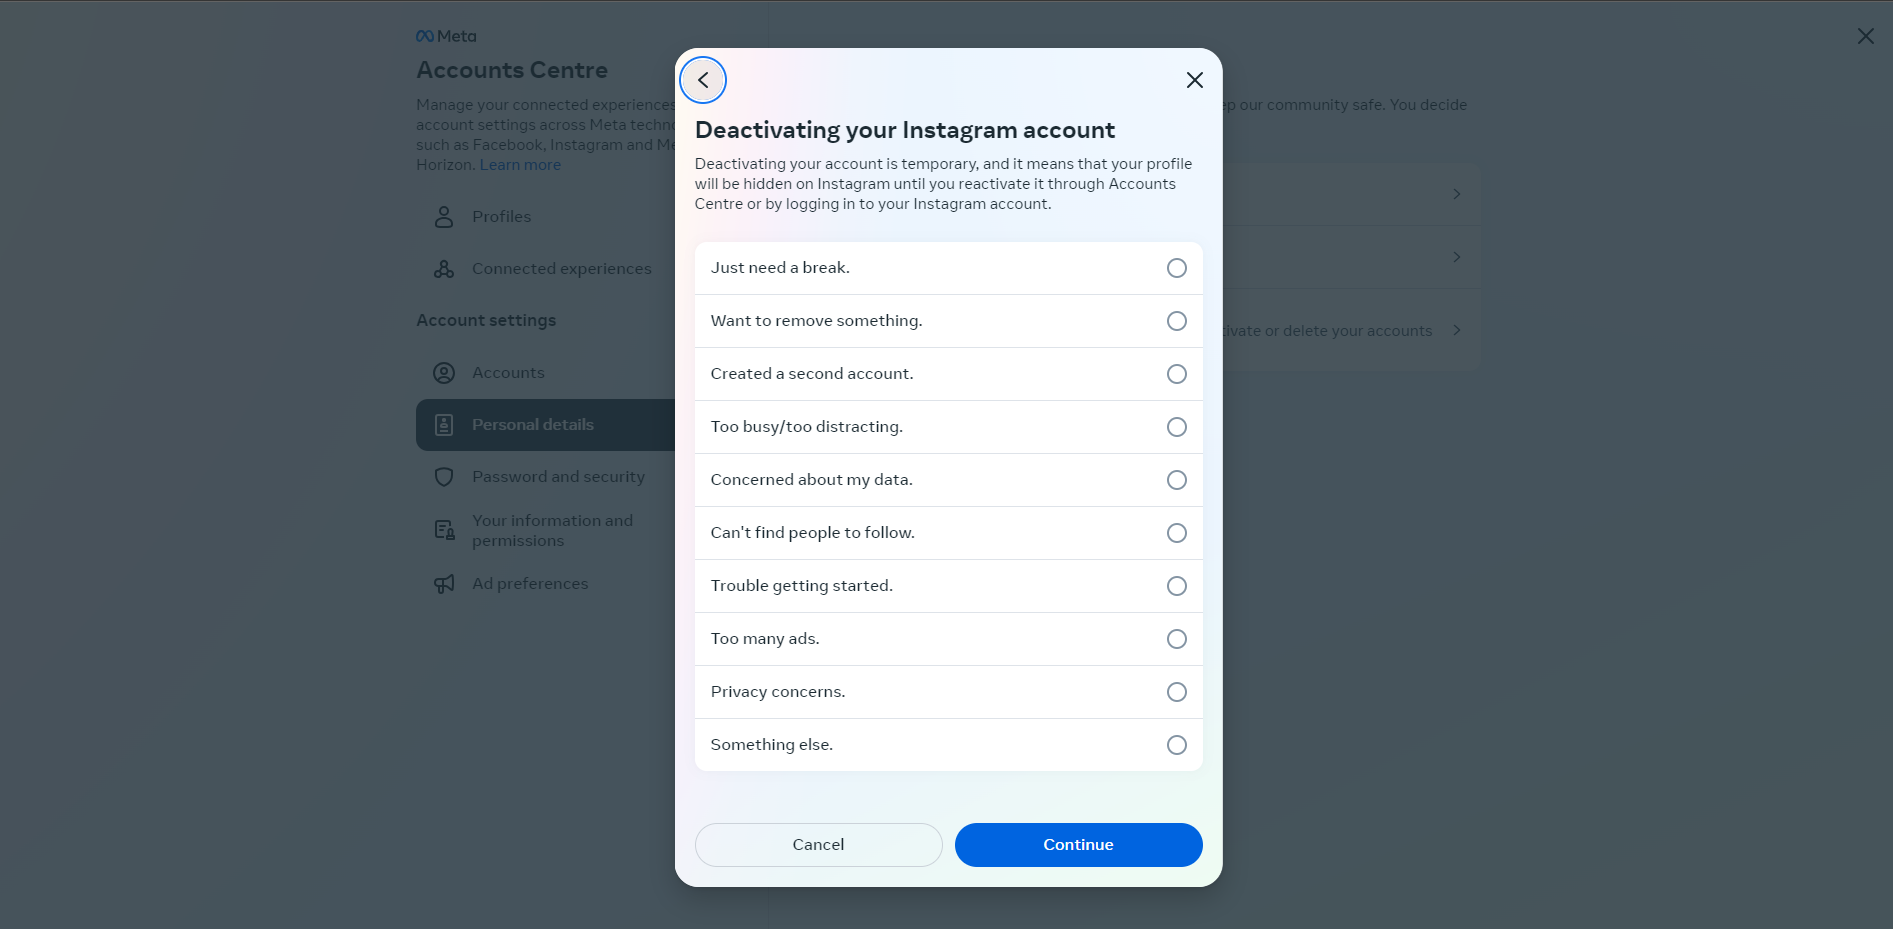
- Re-enter your password for security
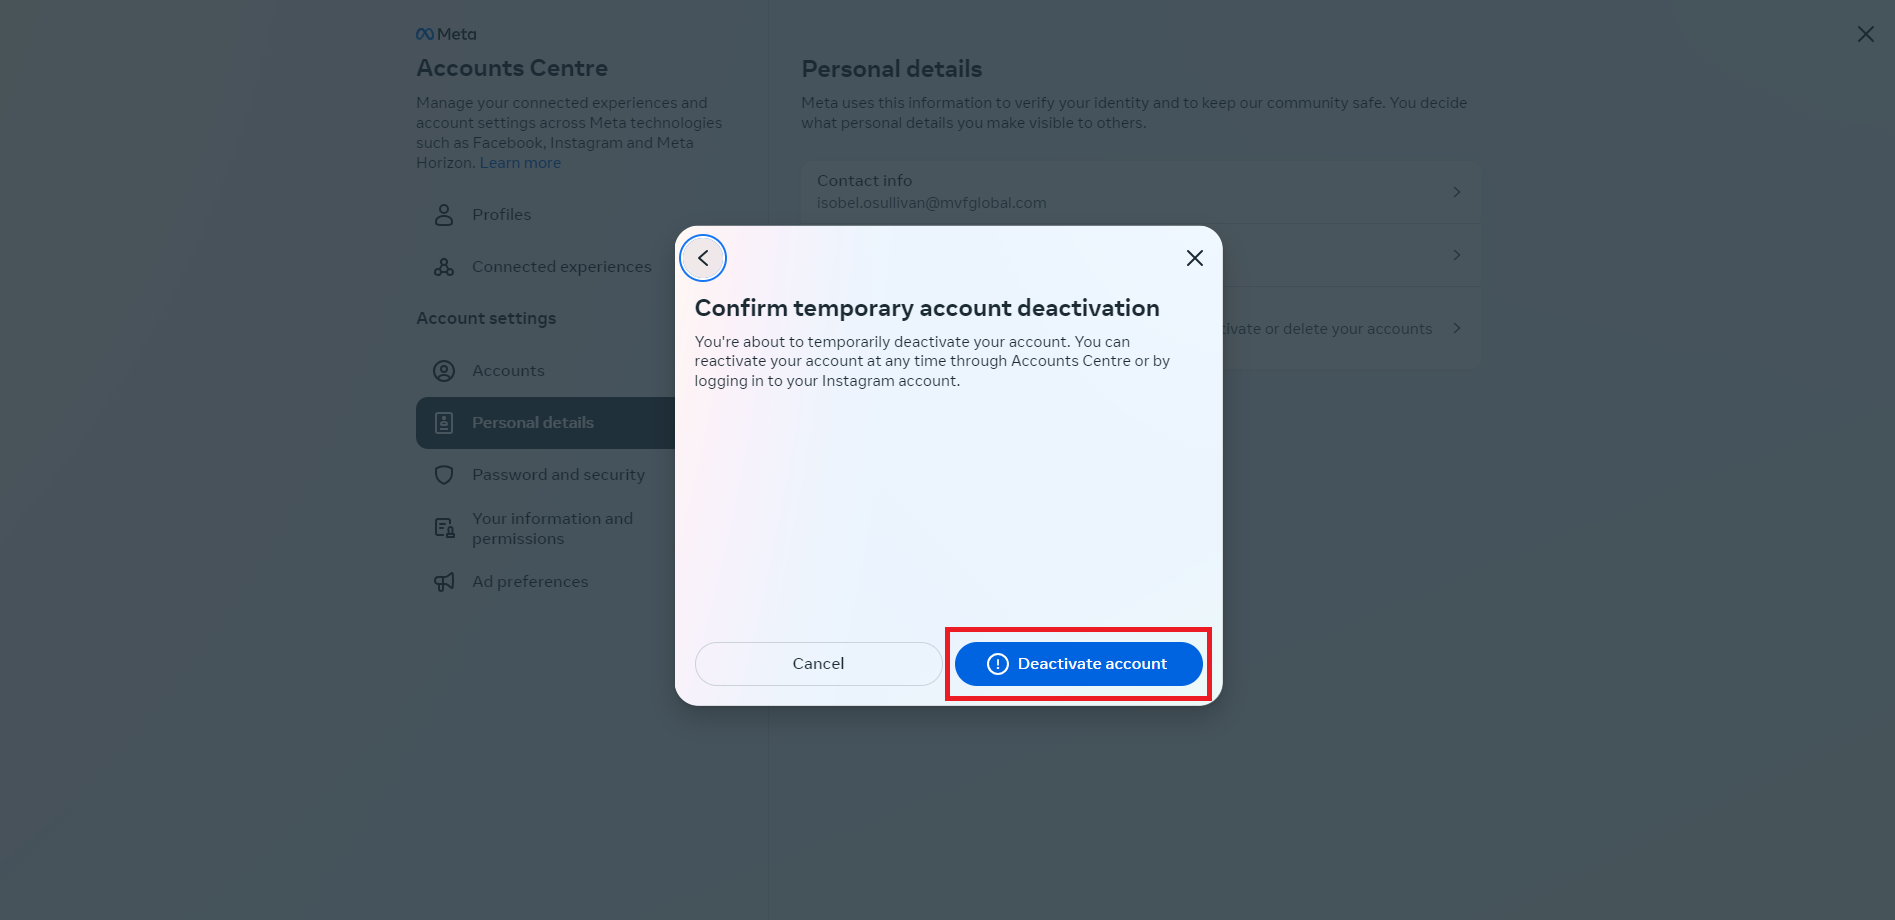
- Finally, click “Deactivate Account”
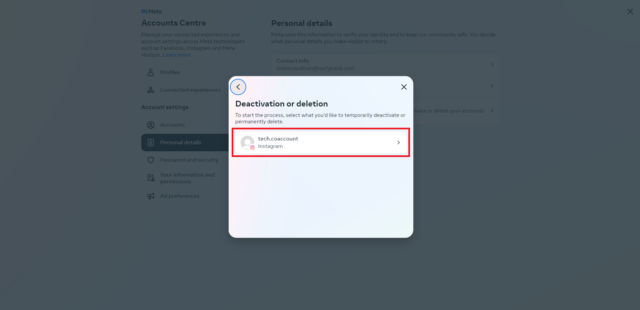
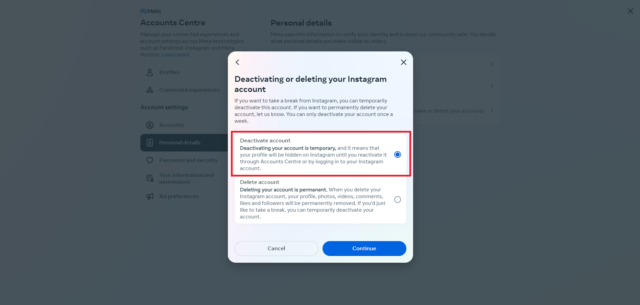
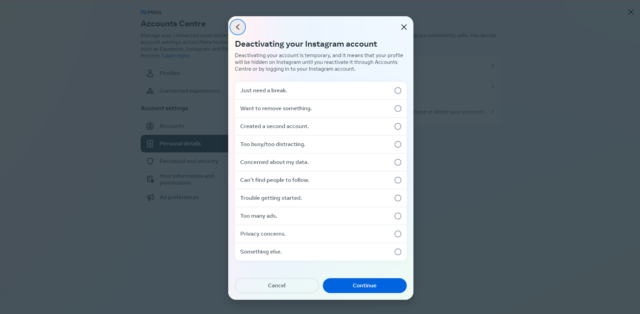
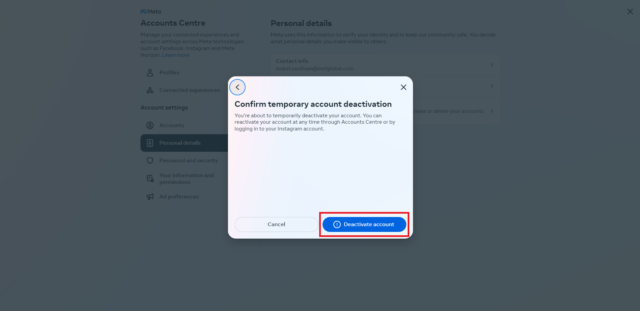
How To Delete Instagram Permanently on Desktop
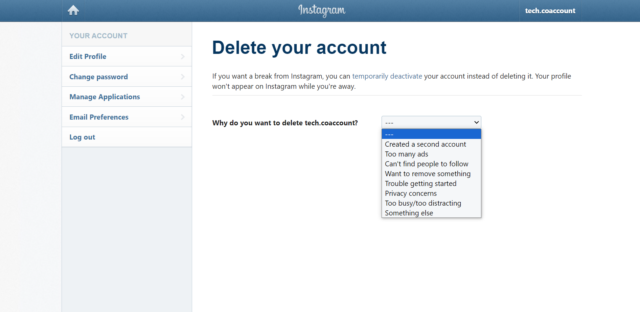
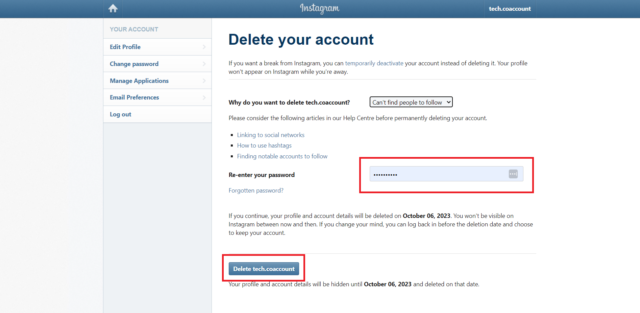
To delete Instagram you can follow the steps above, or take this shortcut:
- Log into your account on the Instagram website
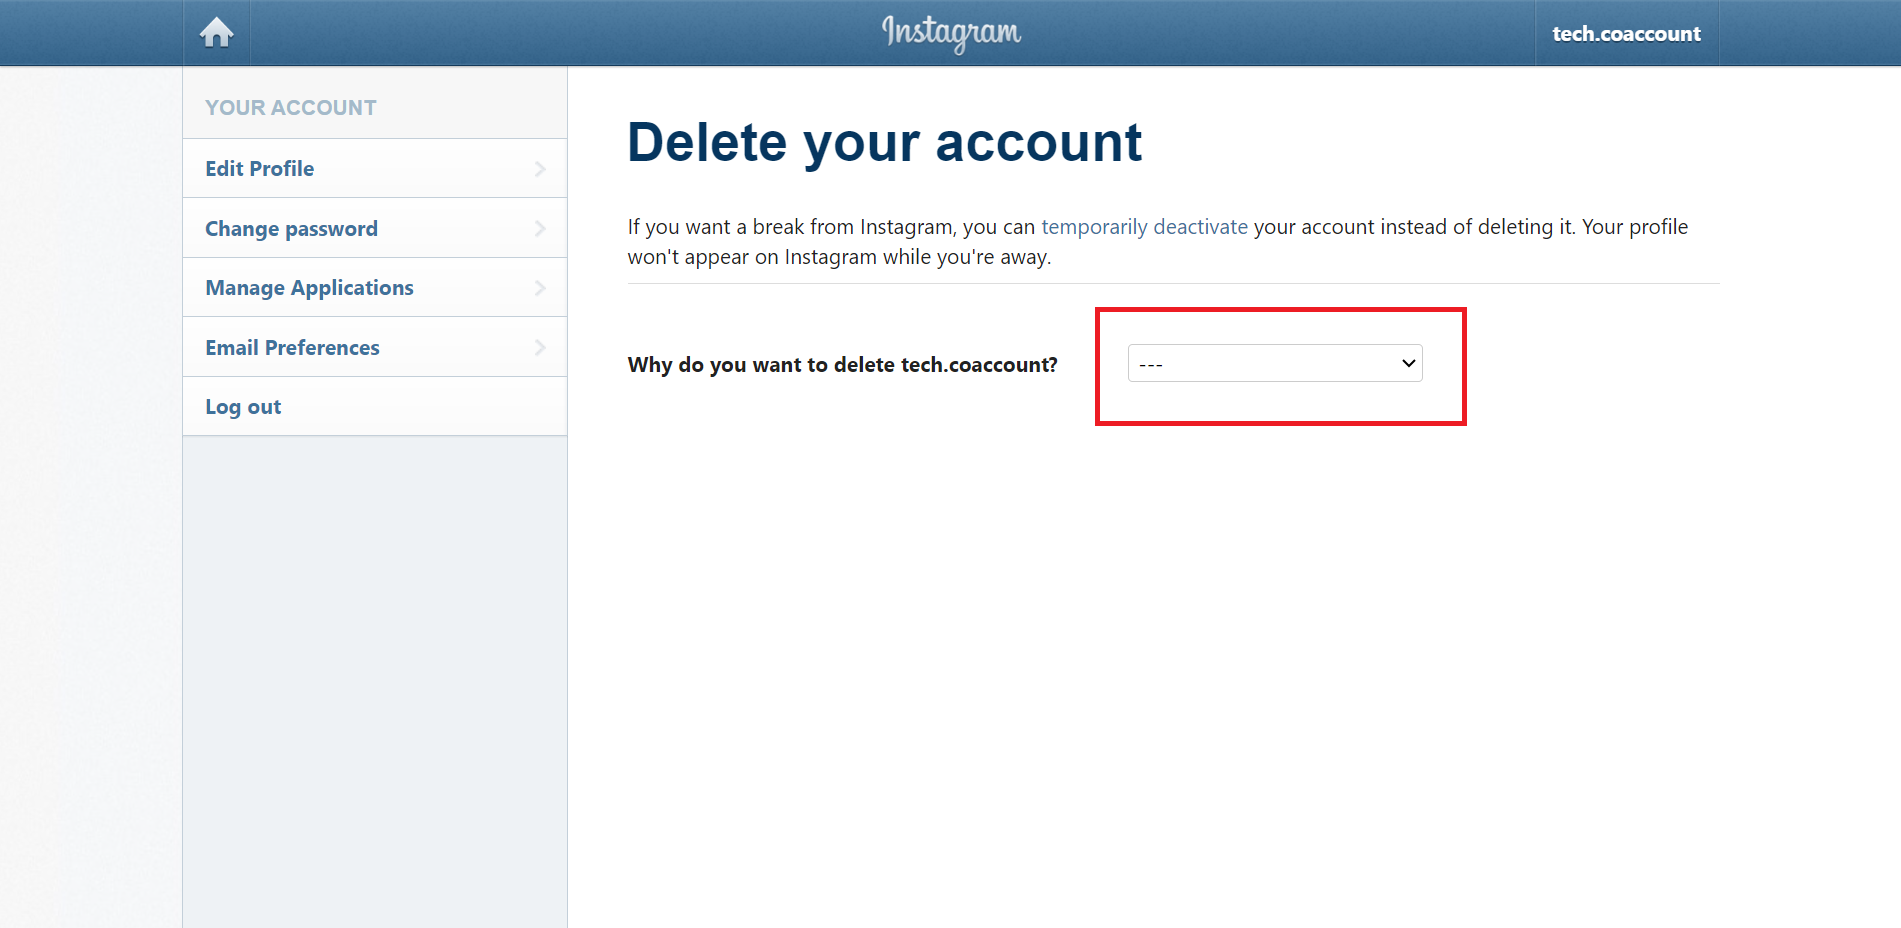
- Visit Instagram’s account removal request page
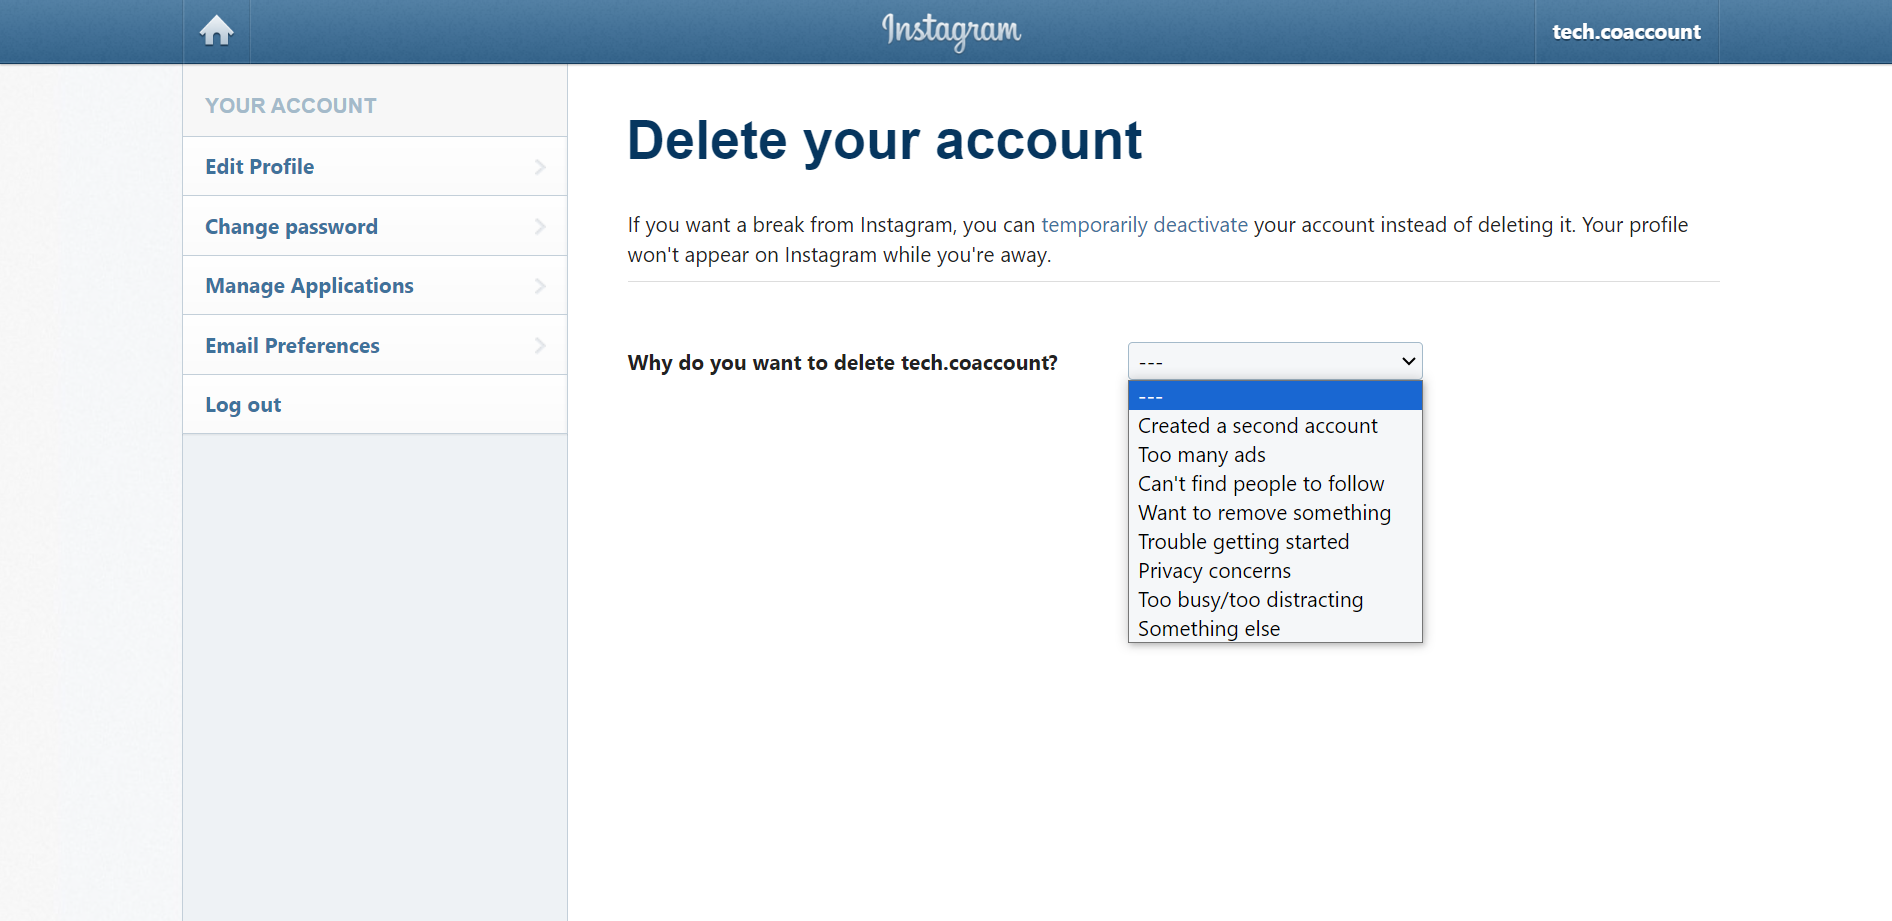
- Select the reason why you wanted to delete your account
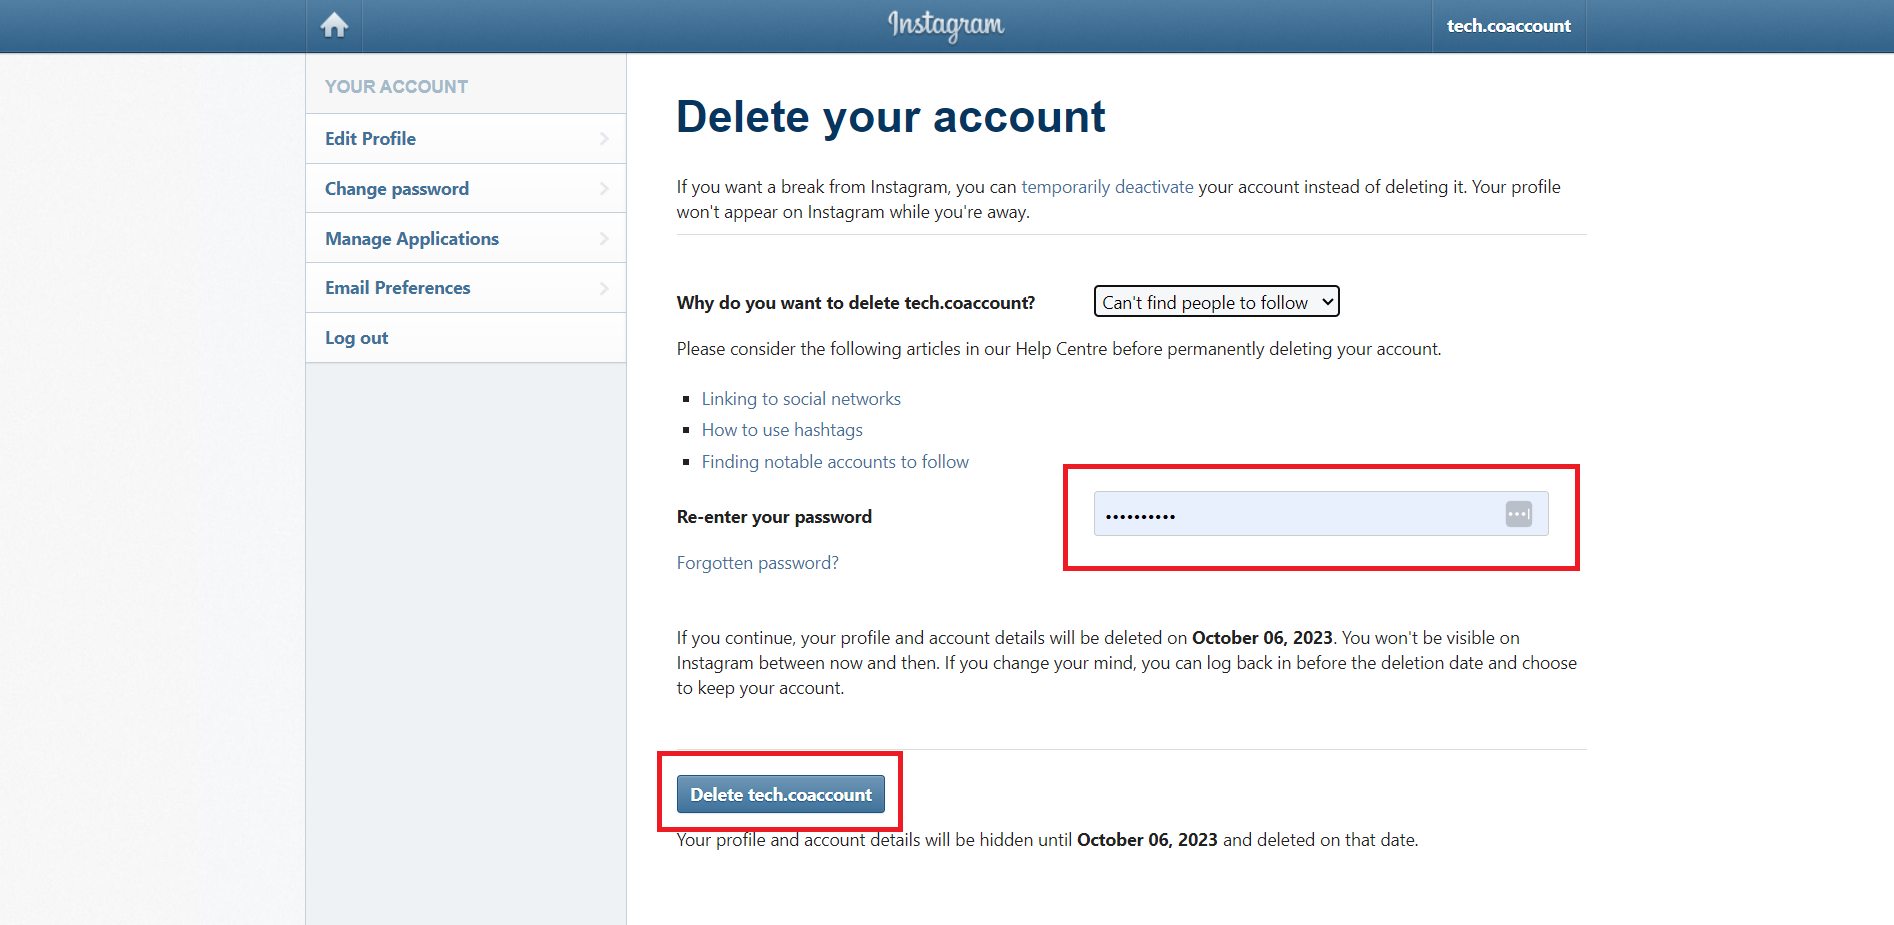
- Re-enter your password for security
- Finally, click “Delete Account”
How to Delete/Deactivate Instagram on iOS App
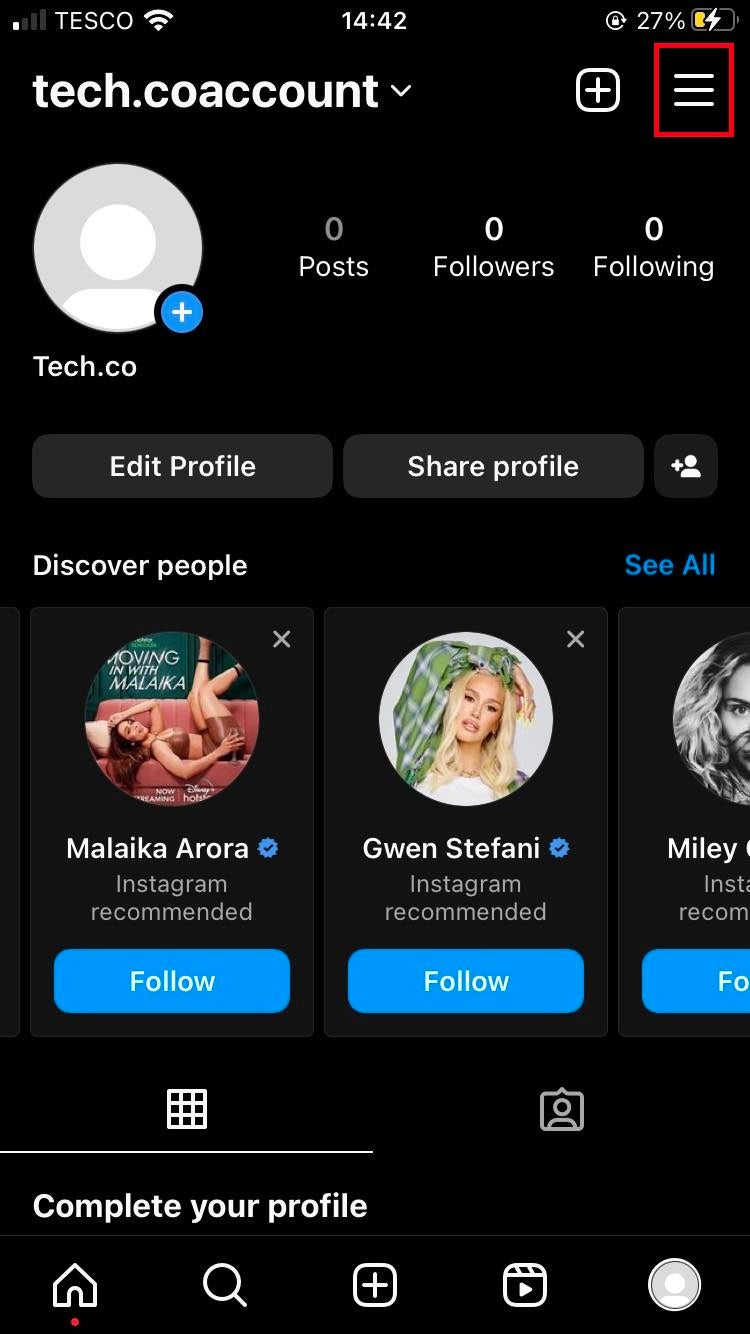
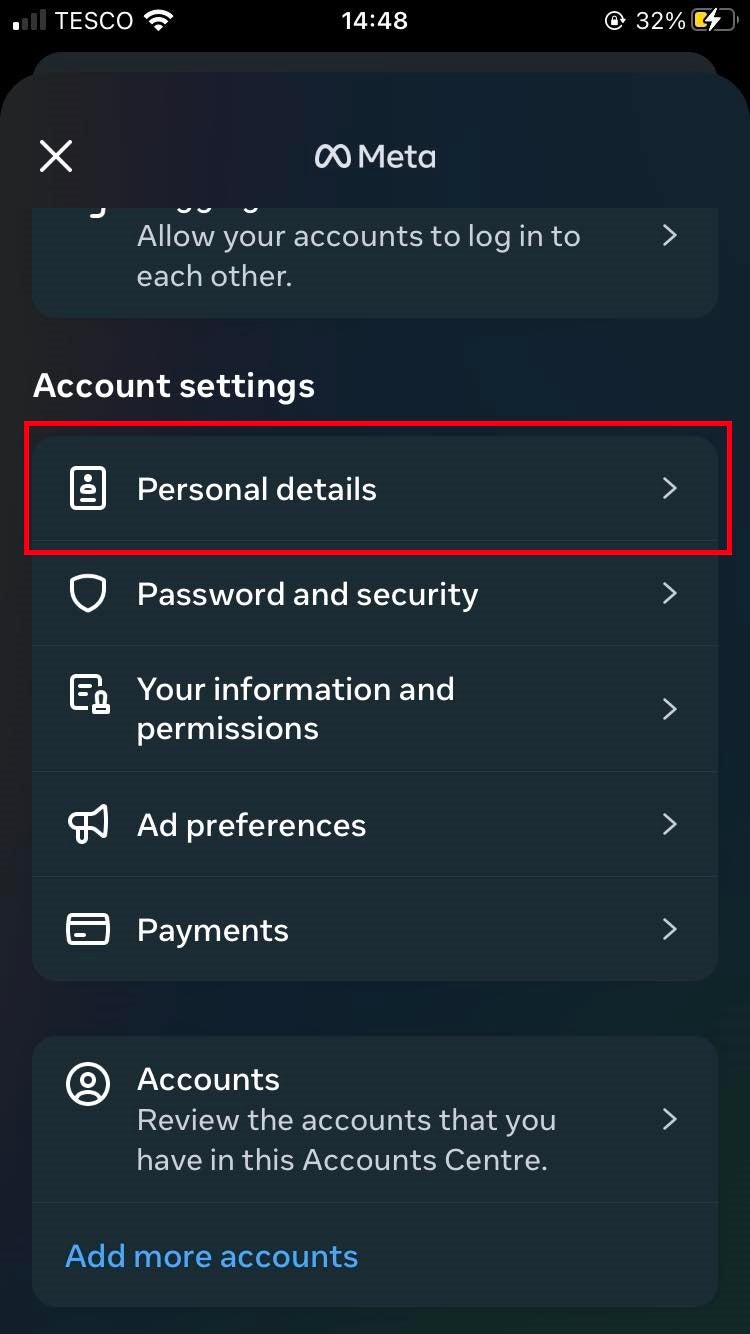
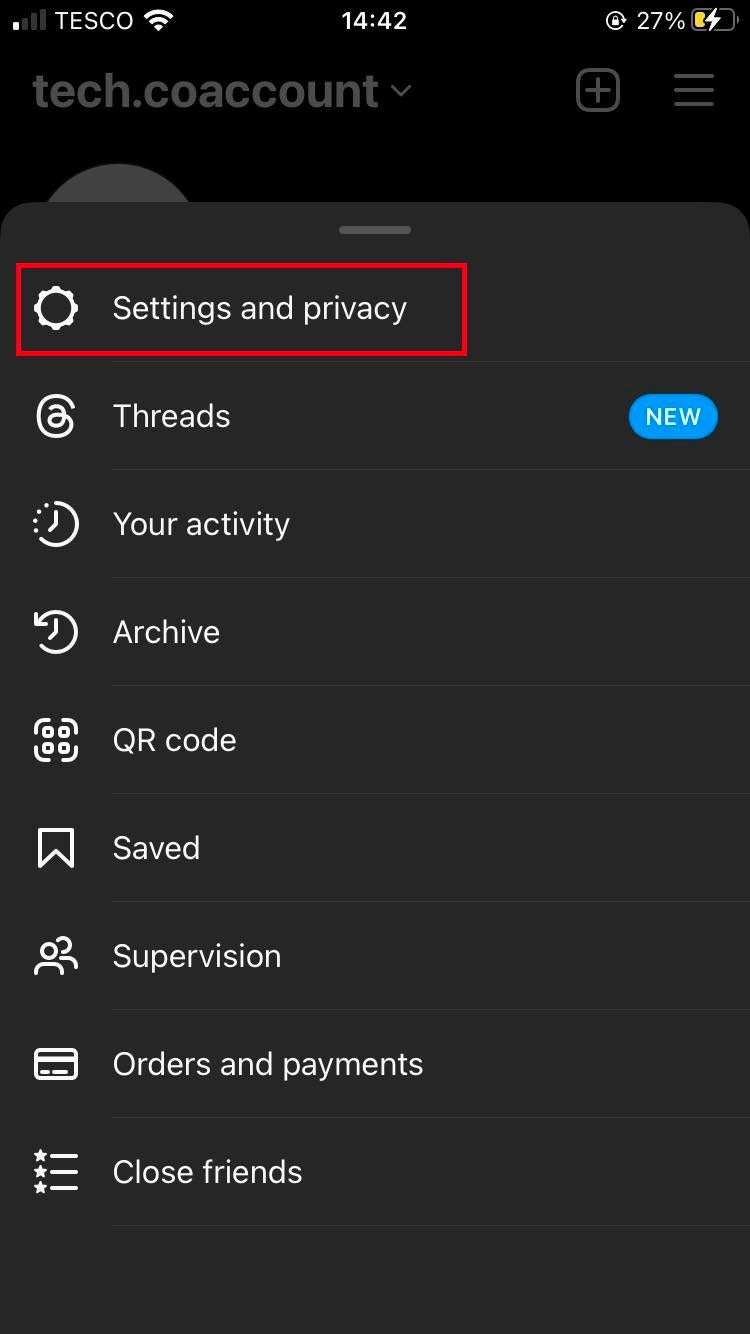
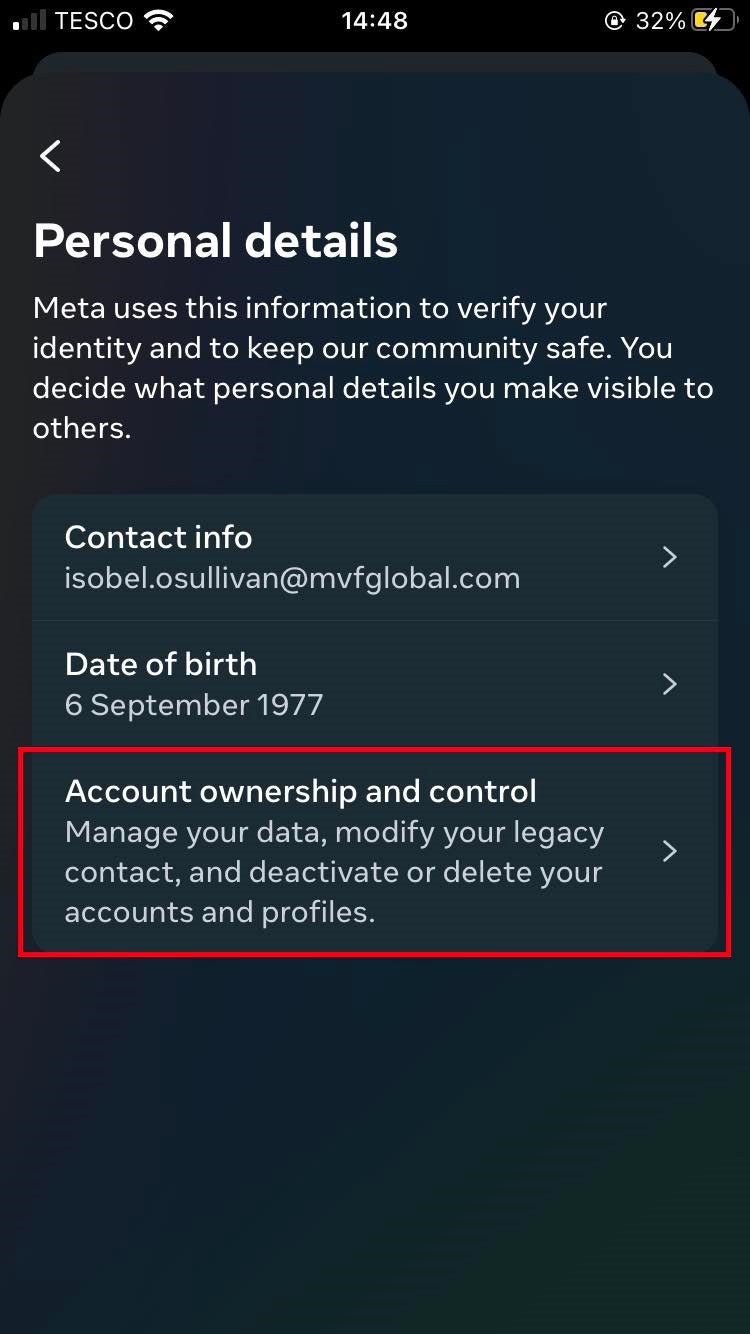
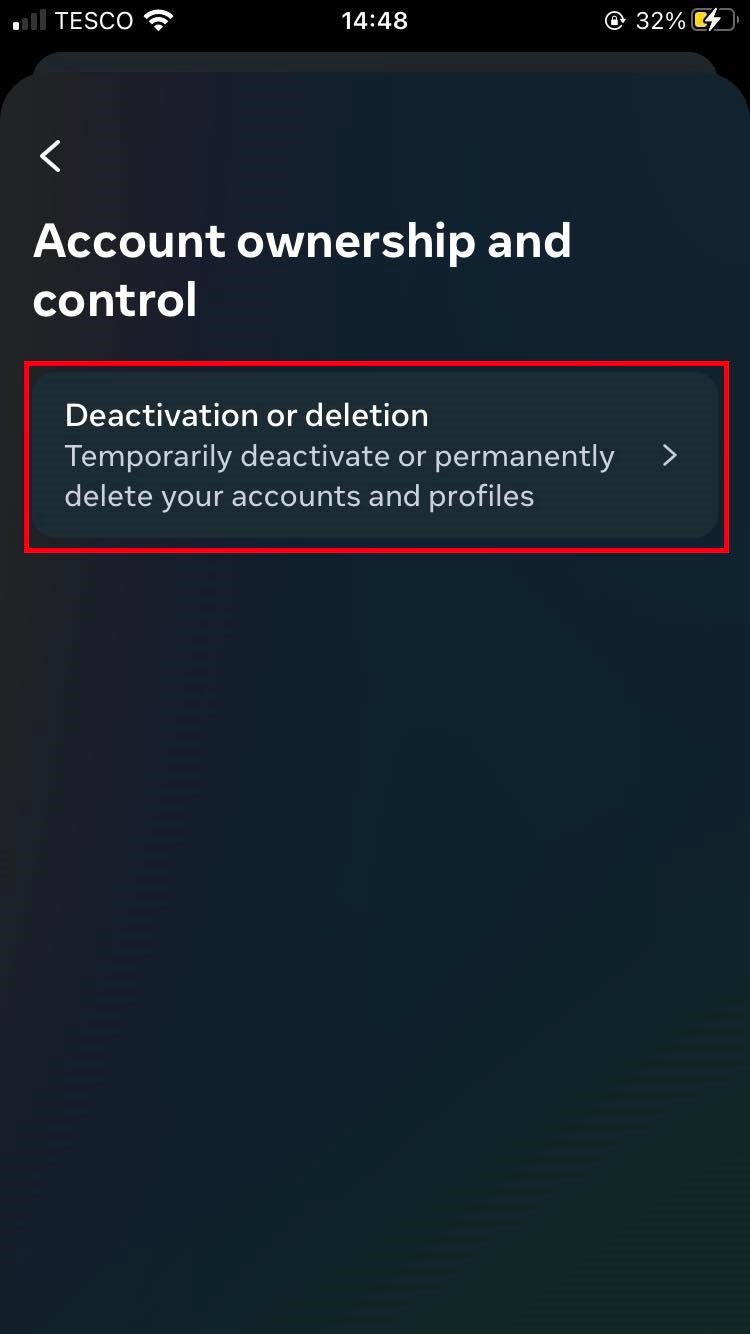
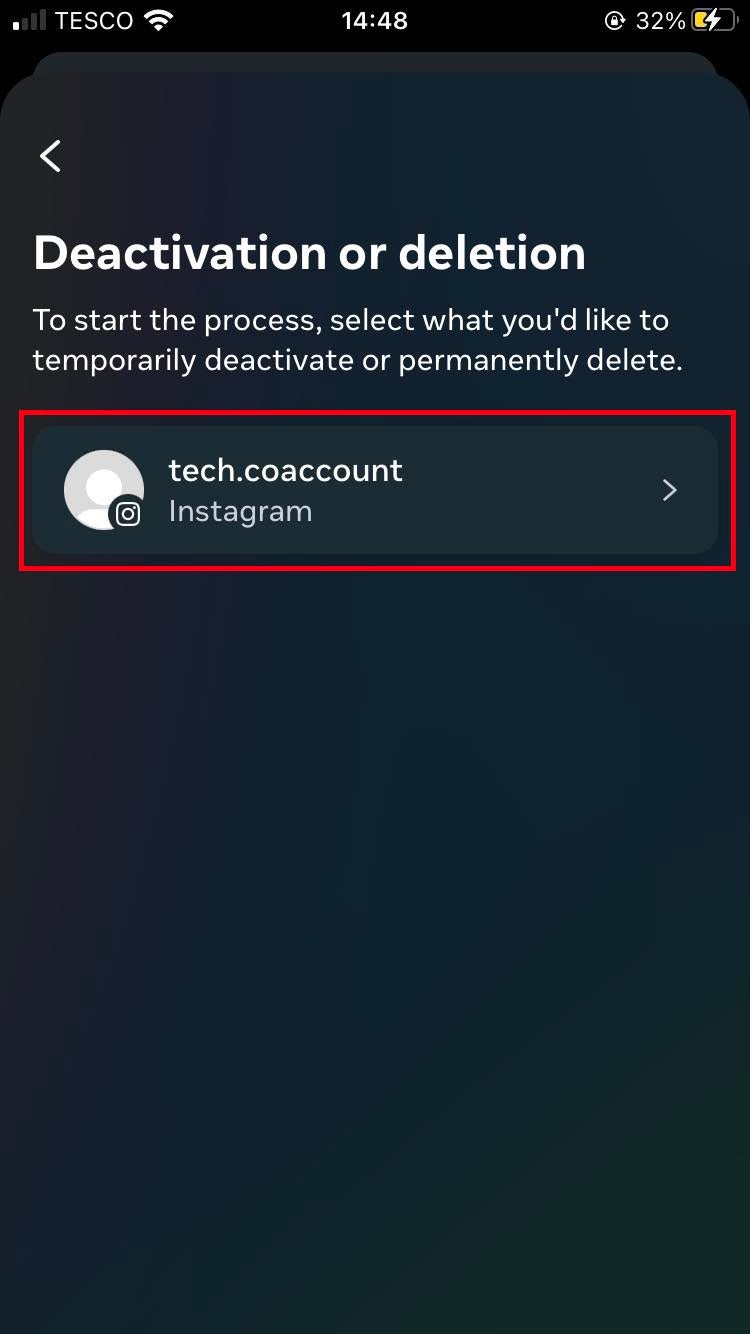
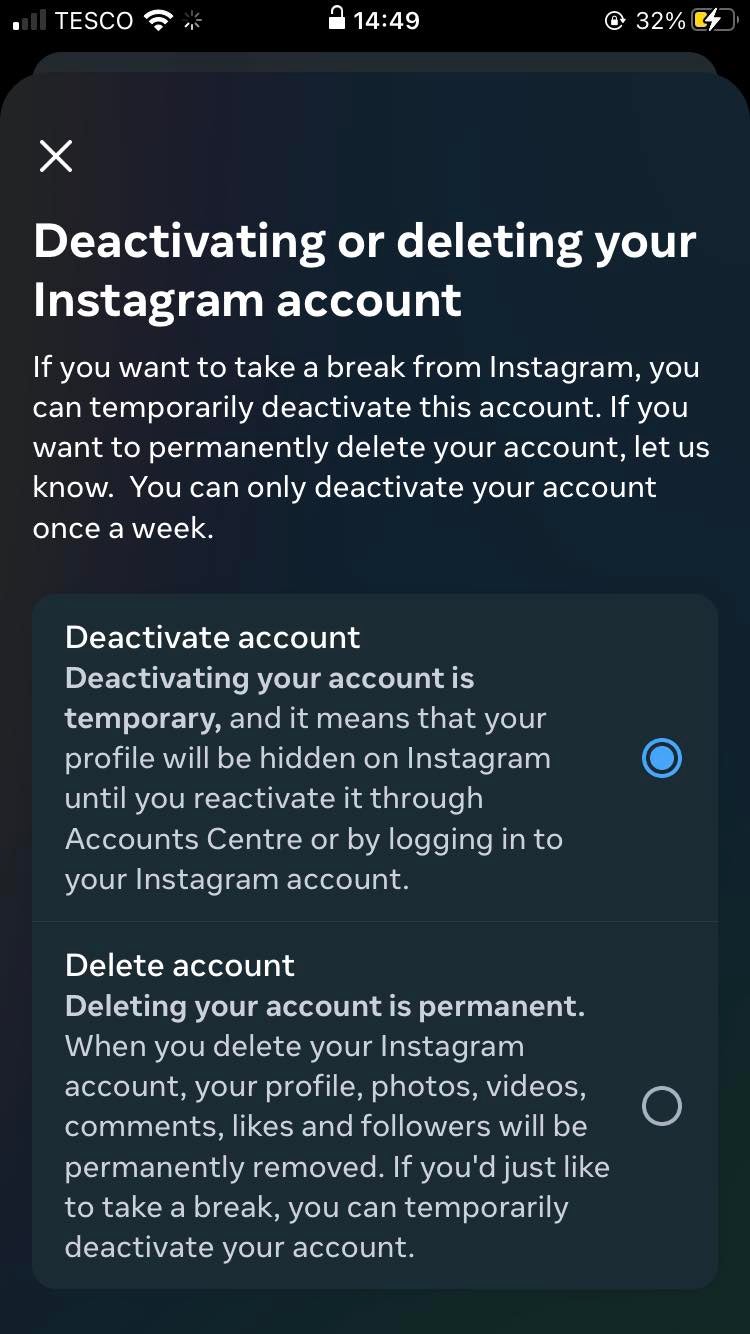
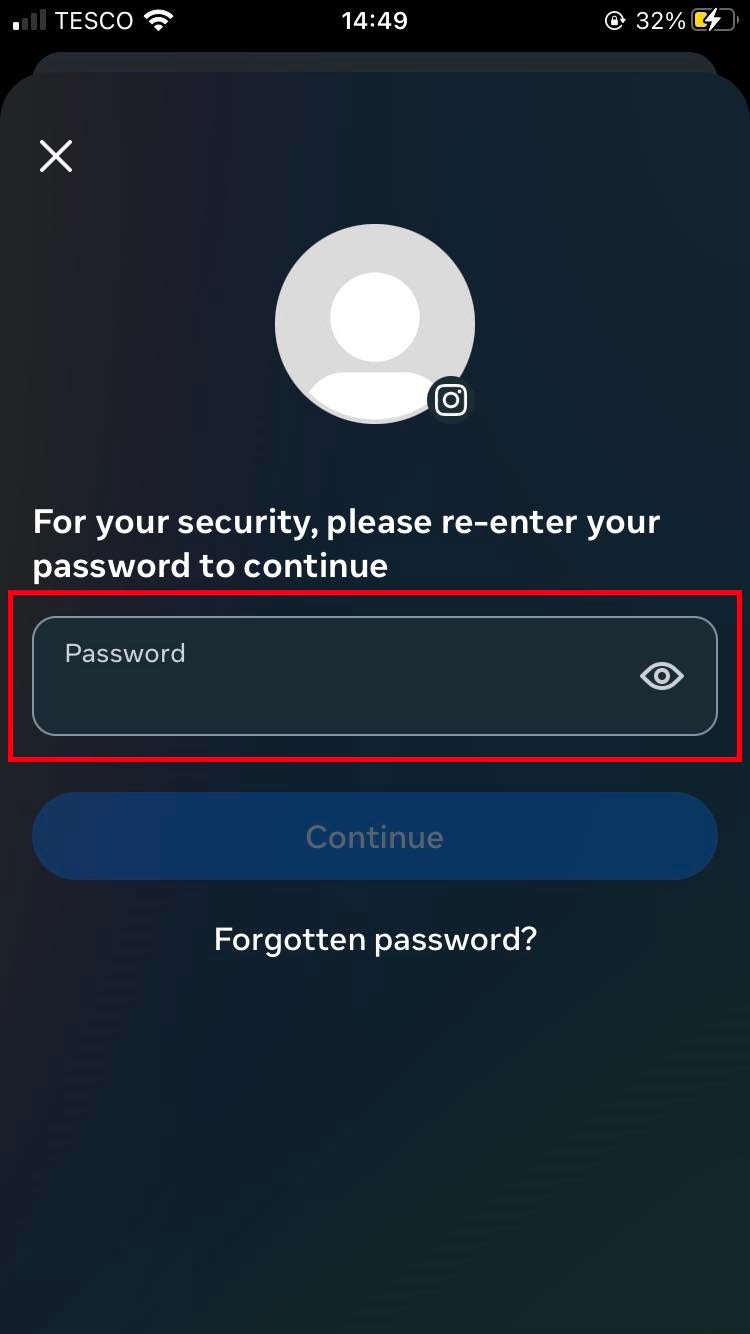
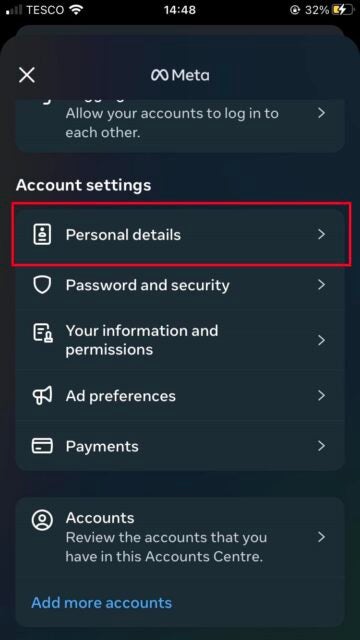
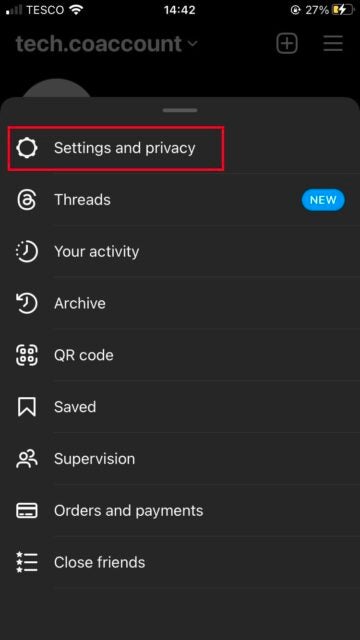
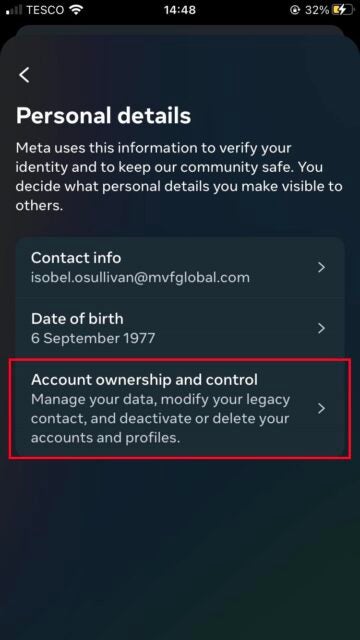
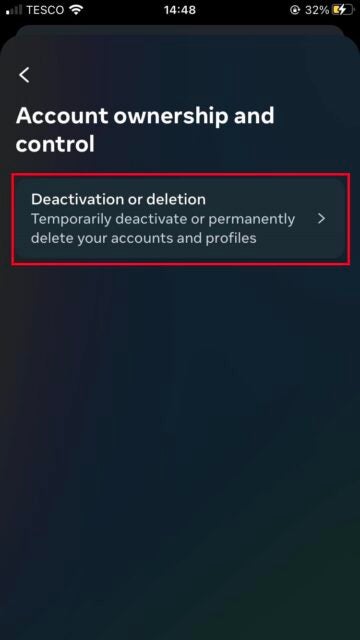
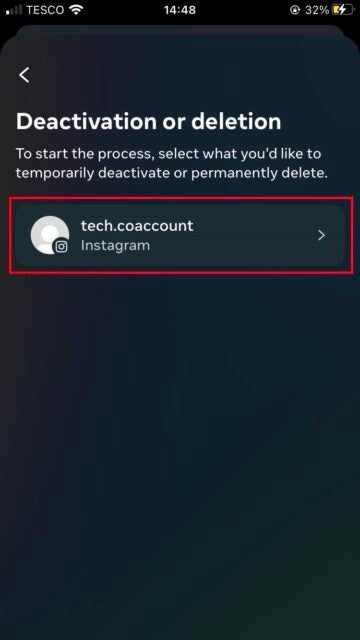
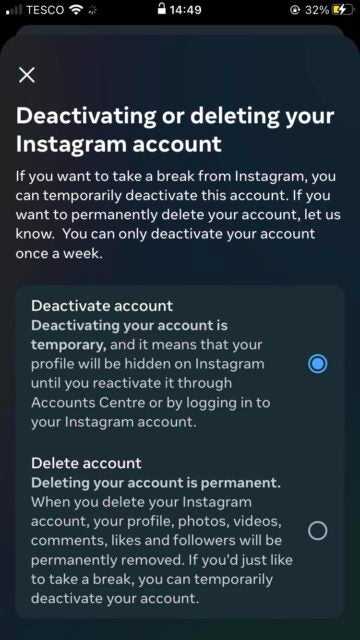
Deleting and deactivating Instagram on an iOS device is notoriously tricky, and the activity wasn’t even available on mobiles until recently. Luckily Instagram users don’t have to default to desktop to void their account anymore — you can follow the steps below to delete and deactivate you account on iOS:
- Open the hamburger icon on the top right of your profile
- Select “Settings and privacy”
- Click on “Accounts Center”
- Select “Personal details” under “Account Settings”
- Click on “Account ownership and control”, then “Deactivation or deletion”
- Select your account
- Tap “Deactivate your account” or “Delete account”, depending on your desired result
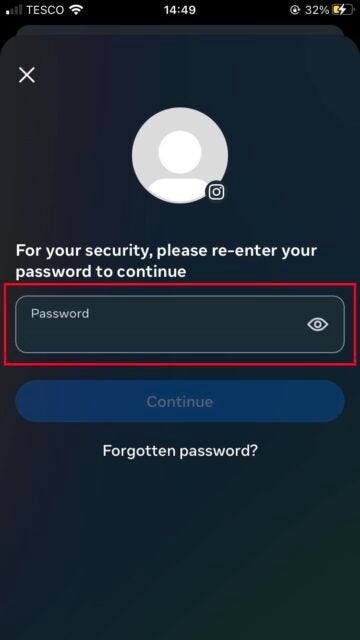
- Enter in your account password
- Select the reason for deactivating or deleting your account
- Confirm your decision

How to Delete/Deactivate Instagram on Android App
Getting rid of Instagram follows the same process no matter what operating system you’re on. So, to delete and deactivate the app from your Android device, you need to follow the same series of steps below:
- Open the hamburger icon on the top right of your profile
- Select “Settings and privacy”
- Click on “Accounts Center”
- Select “Personal details” under “Account Settings”
- Click on “Account ownership and control”, then “Deactivation or deletion”
- Select your account
- Tap “Deactivate your account” or “Delete account”, depending on your desired result
- Enter in your account password
- Select the reason for deactivating or deleting your account
- Confirm your decision
Going cold turkey on social media? Find out how to delete Twitter/X here.
How to Reactivate an Instagram Account
If you deactivated your account by accident or are missing out on the action, don’t worry. Reactivating your Instagram account is extremely simple. It’s also the same process whether you’re on a desktop, iOS, or Android device.
All you have to do is open up the Instagram app, or the site if you’re on a browser, and log back into your account using your credentials. Once you’ve logged back in your account will be restored and your profile will be visible to the public.
Users will need to wait at least a day to reactivate their account after deactivating. And if you’ve deleted your account permanently, restoring your old user activity will be impossible. There is a way to safeguard your Instagram data before deleting your account, however, as we cover next.
How to Backup Your Instagram Data
Deleting your account will permanently erase all account activity, including grid posts, stories, messages, and saved content. Therefore, if you’re ditching Instagram for good, you might want to back up your data first. We outline how this can be possible on mobile devices and desktops, in the following easy-to-follow steps:
On iOS and Android
- Tap the hamburger icon on the top right corner of your profile
- Select “Your activity”
- Click “Download your information”
- Enter the email address you want the data to get sent to
- Wait up to 48 hours for the data to be delivered
On desktop
- Click on your profile picture at the top right of the screen
- Select “Profile”
- Click on “Settings” next to the “Edit Profile” button
- Select “Privacy and security”
- Scroll to the”Data Download” section and click “Request Download”
- Enter the email address you want the data to get sent to
- Wait 48 hours to 14 days for the data to be delivered
